4D Visualization
Enhancing 4D Projection Images
Hidden Surface Removal
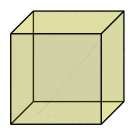
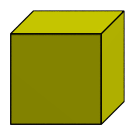
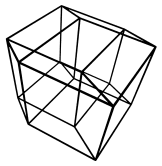
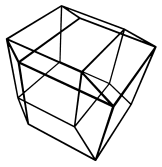
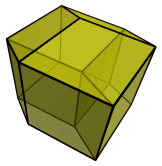
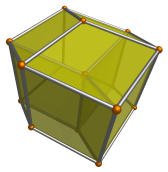
Let's take a look at two images of a 3D cube projected to 2D:


Which of the above images do you more readily identify as a cube? Probably the image on the right. Why? Because although the left image is more accurate (it contains the edges at the back of the cube which are omitted from the right image), it has too much detail, which becomes distracting. Three of the edges in it correspond with edges on the back side of the cube, which should currently be obscured from our view.
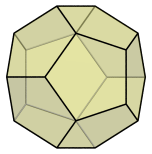
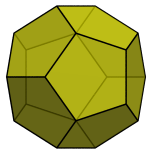
In this particular case, the confusion is minimal because only a small number of edges are involved. But compare the following images:
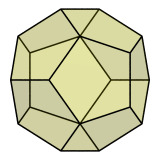
Which of these images help you see the shape of the dodecahedron better? Obviously the right one, because even though the left image contains all 12 faces of the dodecahedron and is therefore more accurate, the faces at the back visually clash with those in front, causing a tangle of lines that obfuscates the whole image. There are many illusory kite-shaped, diamond-shaped, and tetragonal faces that aren't actually faces. In fact, it is difficult to see any pentagonal faces at all! The right image, on the other hand, does not suffer from these problems, because hidden surfaces have been removed from it.
These examples make it clear why hidden surface removal (HSR) is important in projections. Although we often think more information is better, sometimes clarity is more important.
Removing hidden surfaces also helps us tell what is in front and what is behind. For example, consider the following oblique projection of the 3D cube, also known as the tumbling cube illusion:
It is hard to say whether it is the lower left face or the upper right face that is the front of the cube, because this image doesn't tell us what is in front and what is behind. If we applied hidden surface removal, however, it would remove all doubt:
Hidden Surface Cueing
There is a middle ground between leaving all edges in the image and risking visual confusion, and completely removing hidden edges, thereby losing some information about the original object. Instead of completely removing obscured edges, we can indicate that they are obscured by using visual cues such as lighter lines.
For example, the following image of the dodecahedron uses a lighter color for edges that are hidden:
Now we can see all the edges and faces of the dodecahedron, and it is less confusing which ones are in front and which ones are behind.
Ultimately, line-drawings are limited in conveying the structure of 3D shapes. A better way is to render surfaces with some degree of transparency in order to indicate what is in front or behind:
We can further enhance these images by using thin cylinders for edges and little spheres for vertices:

We shall now look at how these image enhancement methods may be applied to 4D projections.
Enhancing a 4D Projection
When we project a 4D object, we are actually doing two projections:
- Projection from 4D to 3D, to form a 3D image that a 4D being would see;
- Projection from 3D to 2D so that it can be shown on the computer screen.
Now, projections of 4D objects are usually very complex. If we simply apply these steps without any enhancements, the result will often be very hard to understand. Sadly, many Java applets and other programs that perform projections of 4D objects use line-drawings with no enhancements applied. As a result, all we see is a large mass of tangled lines that leaves us totally confused. We need to apply some enhancements, at the very least, HSR (hidden surface removal).
However, as we have seen in the previous chapter, the internal structure of the 3D image produced by the first step is also very important; so we cannot blindly apply HSR to both steps. In particular, if we apply HSR to the second step, only half of the projection envelope is left of the 3D image. The result would not be very insightful at all.
Therefore, we should apply HSR to the first step so that the resulting 3D image is not cluttered, and then we apply HSC (hidden surface cueing) to the second step, so that the internal structure of the 3D image is retained, while making it easier to discern the 3D shape in the resulting 2D image.
Consider the following line-projection of the 4D hypercube, without HSR:
Confusing, isn't it? Now let's apply HSR by removing edges hidden from the 4D viewpoint:
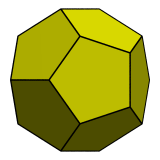
Better, but it is still difficult to discern the 3D shape of this projection because we're projecting the 3D shape into 2D. It is possible to add more enhancements to our line-drawings to make it easier to understand, but ultimately, the only real solution to the fundamental limitations of line-drawings is to discard them and move on to 3D renderings with transparent faces, and lighting and shade:
The 3D structure of this projection is now much clearer. Finally, we add one last enhancement to this image by using thin cylinders and spheres for edges and vertices:
Now the image is much easier to understand. We can see that it has a rhombic dodecahedral envelope, with three internal edges that meet at a vertex inside the envelope. It is similar to the rhombic dodecahedral projection of the hypercube that we saw in the previous chapter.

